These vegan Coconut Cream Bars are creamy, decadent, and a dream to make! Made with nine simple and wholesome ingredients, these no-bake healthy treats are amazing!
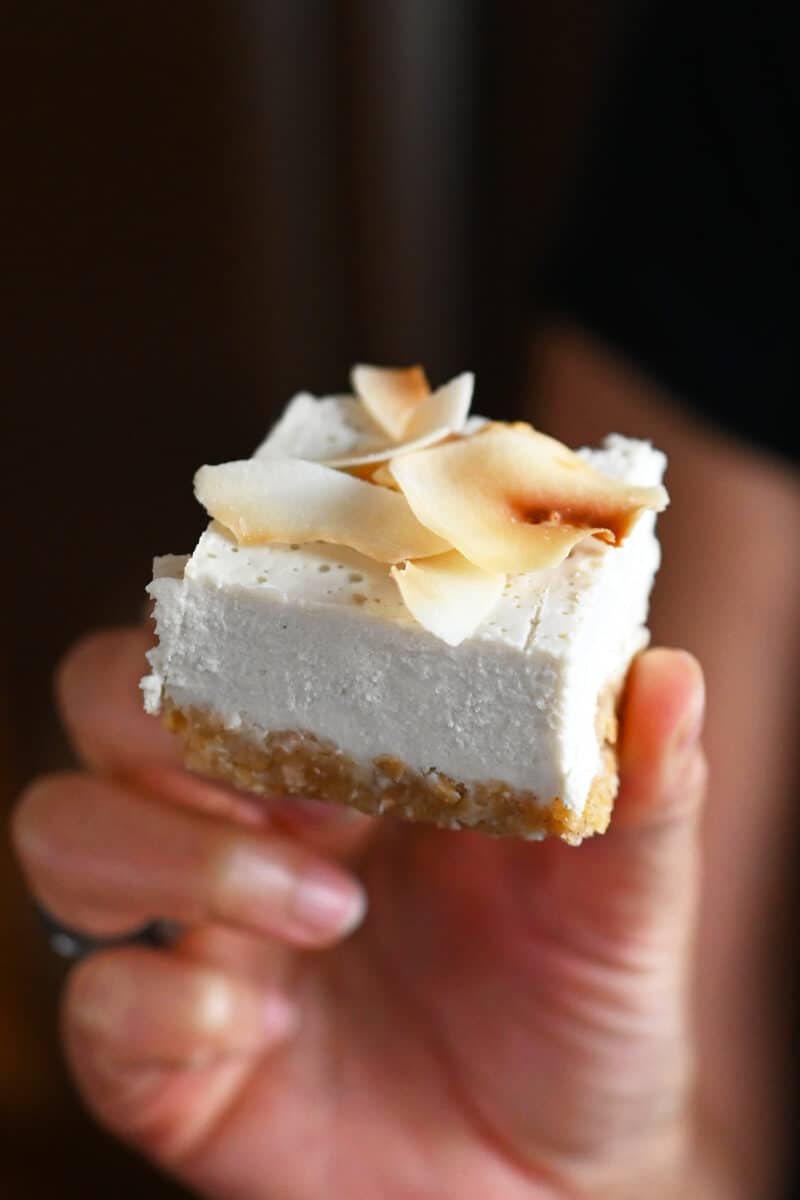
Table of Contents
The best coconut cream bars!
Seriously: the taste of these silky coconut cream bars instantly transport me to Kauai! A few years ago, we stumbled upon Trilogy Coffee on the north shore of Kauai; besides offering delicious espresso drinks, Trilogy also serves gorgeous squares of raw vegan treats. All of Trilogy’s desserts are fabulous, but the one dessert I ordered over and over again was the Coconut Kream Pie: a dessert that’s perfect for coconut lovers craving something light and creamy, not-too-sweet, and with the perfect nutty crust.
After doing lots of tasty tinkering in my kitchen, I managed to dream up my own version using easy-to-find ingredients here on the mainland!
Why you’ll love these coconut cream bars
- They’re a simple, no bake dessert!
- Each bite is creamy and packed with coconut flavor—and the crust tastes like a yummy granola bar!
- You can make the coconut cream bars ahead of time and store them in the freezer!
- They’re similar to Hawaiian haupia bars, but with more of a soft cheesecake texture!
- They’re 100% gluten-free, vegan, dairy-free, low carb, and paleo!
Tips on how to make the best coconut cream bars
- Use the best-quality canned coconut cream or full-fat coconut milk you can find! These are coconut cream bars, after all, so the better tasting your canned coconut cream or milk, the tastier the bars. The brands I like best are Aroy-D, New Seasons Market’s in-house brand, and Whole365 brand. Although my recipe says you can use either coconut milk or cream, I’ve found that canned coconut cream is ideal for this recipe because the resulting filling is creamier and the bars hold their shape better. Do not use Cream of Coconut (found in the liquor section)—it’s a totally different ingredient, and it’s waaay too sweet!
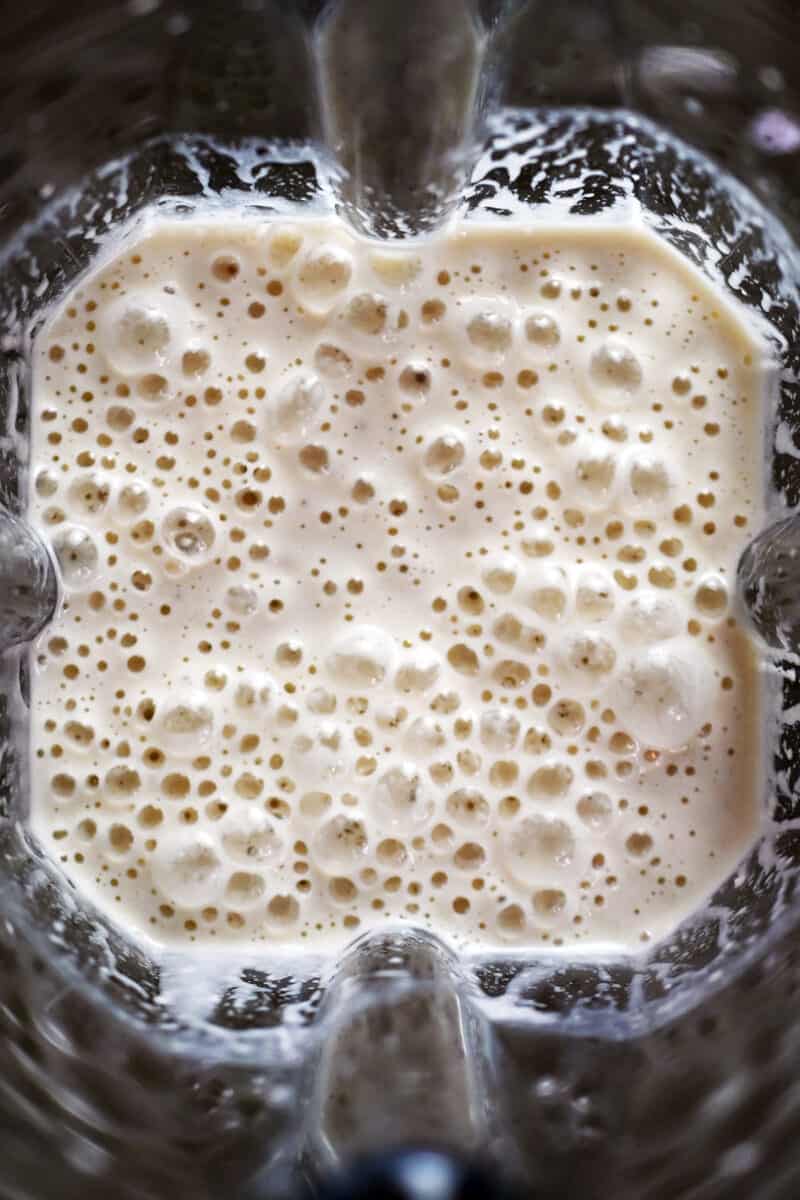
- A powerful blender will ensure a creamy and silky texture. Similar to my other vegan desserts that use soaked cashews, the filling of the recipe should be blended in a high-powered blender like a Vitamix.
- Toast the almond slivers and coconut flakes for the most flavorful crust! If you didn’t buy the slivered almonds and coconut flakes pre-toasted, take the extra time to toast them until golden brown—your tastebuds will thank you!
- Freeze the bars to set them properly. The coconut bars will not set properly in the refrigerator so you definitely need to chill them in the freezer before cutting them into squares.
Ingredients
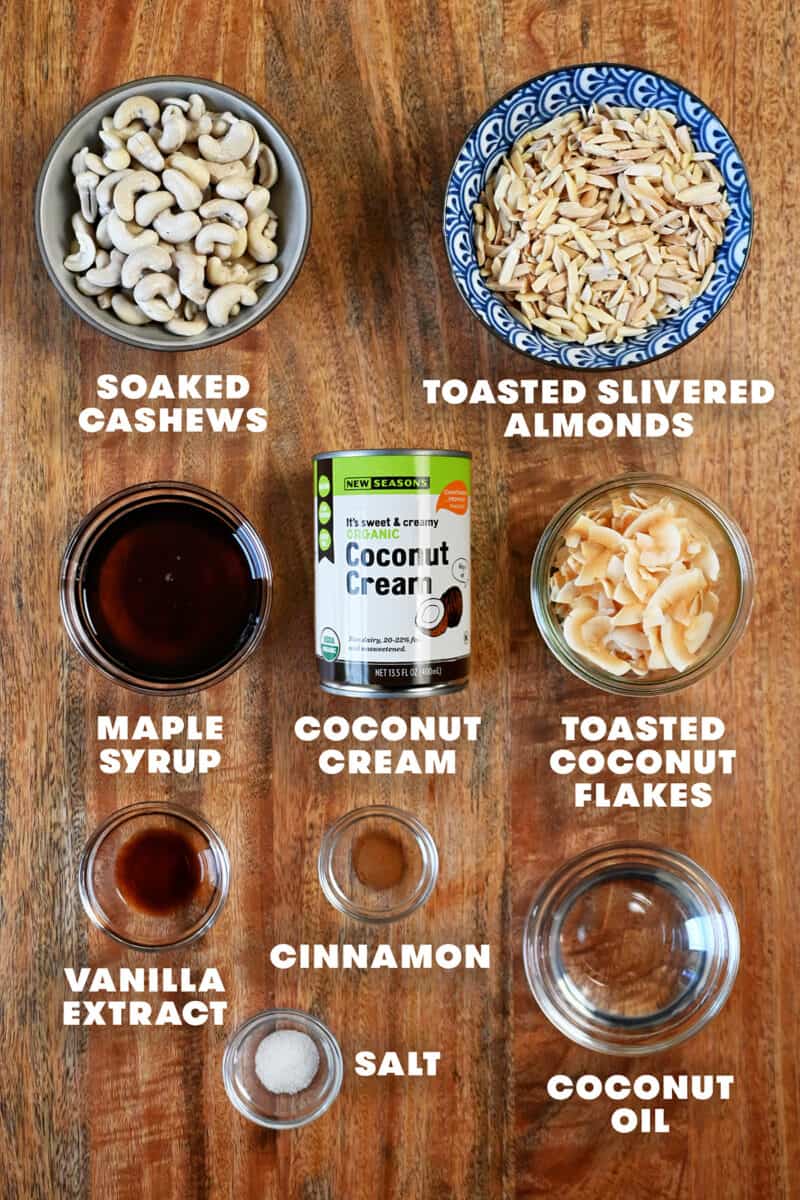
You only need to gather 9 easy-to-find wholesome ingredients to make these coconut bars!
- Soaked raw cashews: You can quickly soak the cashews in boiling water for 30 minutes (or in room temperature water for about 4 hours).
- Toasted slivered and blanched almonds: You can buy toasted slivered almonds at Trader Joe’s or you can toast them yourself on a parchment-lined baking sheet at 325°F for 10 to 15 minutes or golden brown.
- Toasted unsweetened coconut flakes or shredded coconut: You can buy toasted coconut flakes (e.g., Let’s Do Organic brand) or you can toast the yourself on a parchment-lined baking sheet at 300°F for 3 to 5 minutes or until golden brown.
- Coconut cream or full-fat coconut milk
- Coconut oil: It helps the coconut bars set up when you chill them. Because you’re making coconut cream bars, there’s no need to buy refined coconut oil—you want the coconut taste from the unrefined stuff.
- Maple syrup: You can substitute honey for the maple syrup if desired. If you want to make the coconut bars keto and sugar-free, you can substitute liquid allulose or another sugar-free liquid sweetener.
- Vanilla extract
- Ground cinnamon
- Diamond Crystal kosher salt
How to make coconut cream bars
Make the crust
Place the toasted slivered almonds and coconut flakes in the bowl of a food processor and pulse them together until the texture resembles coarse cornmeal.
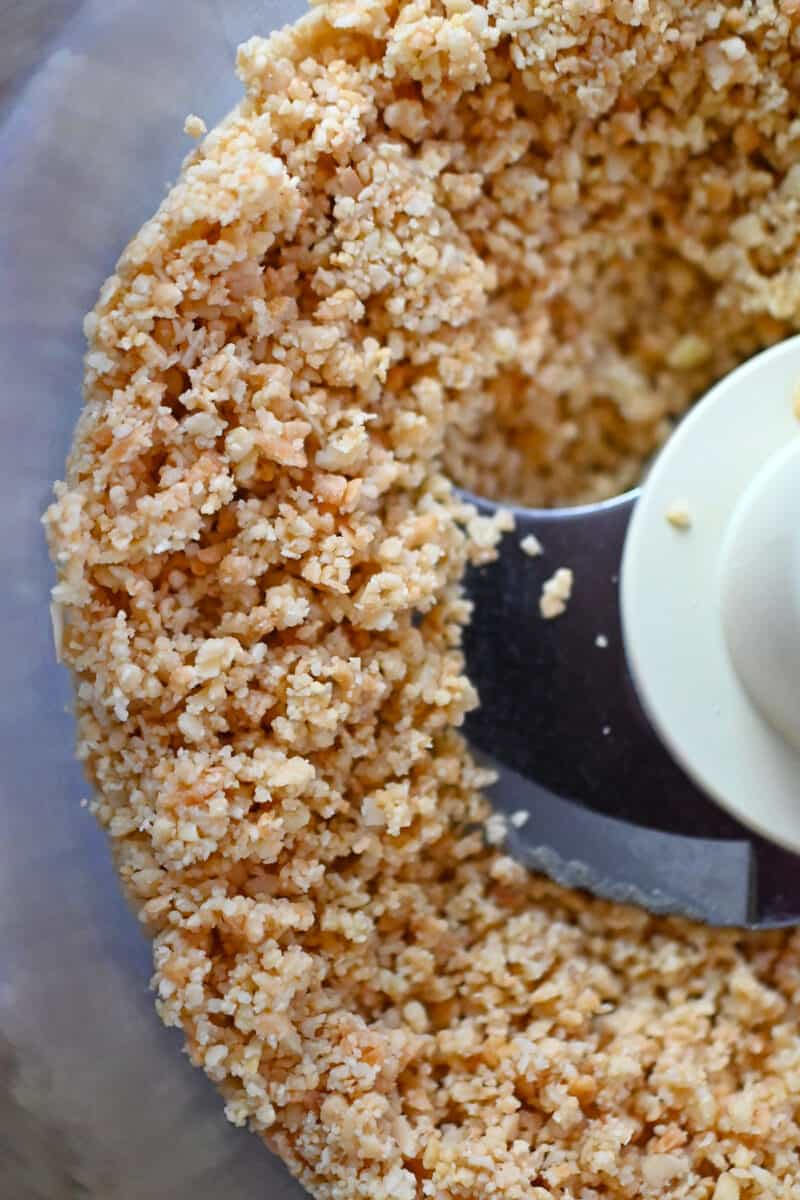
Add the maple syrup, coconut oil, cinnamon, and salt.
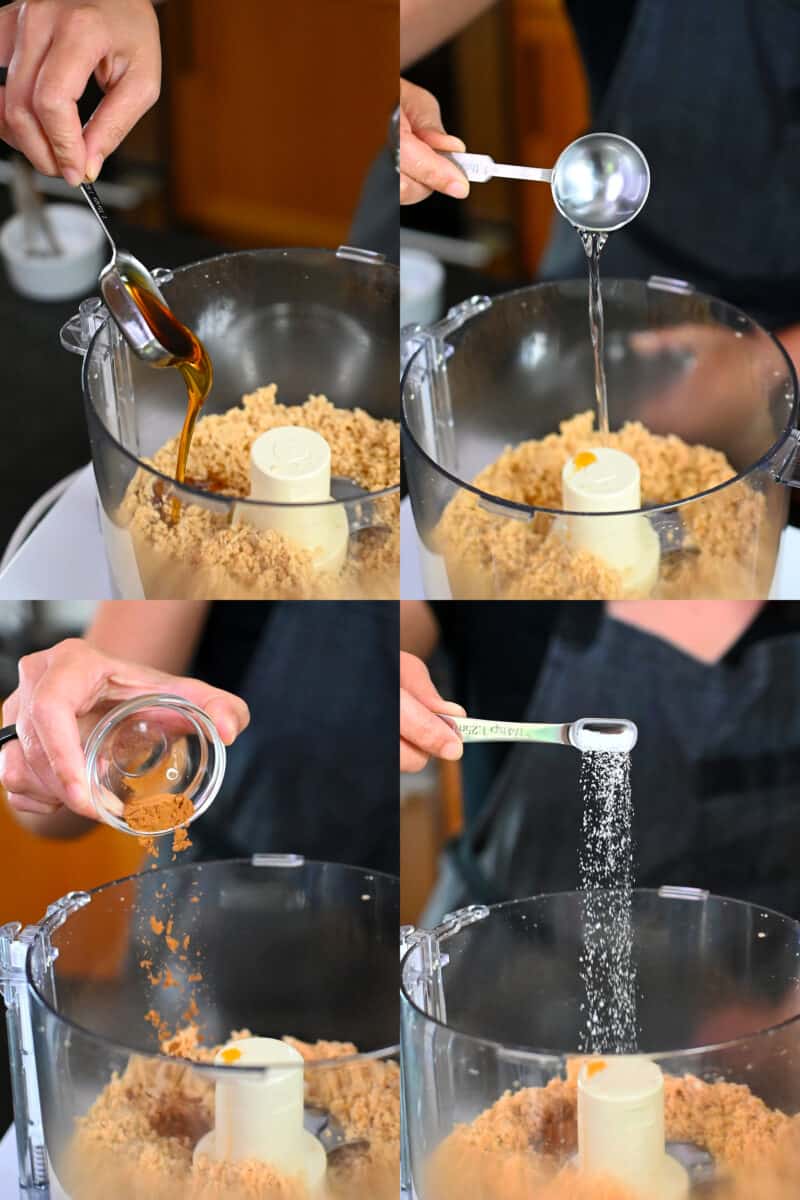
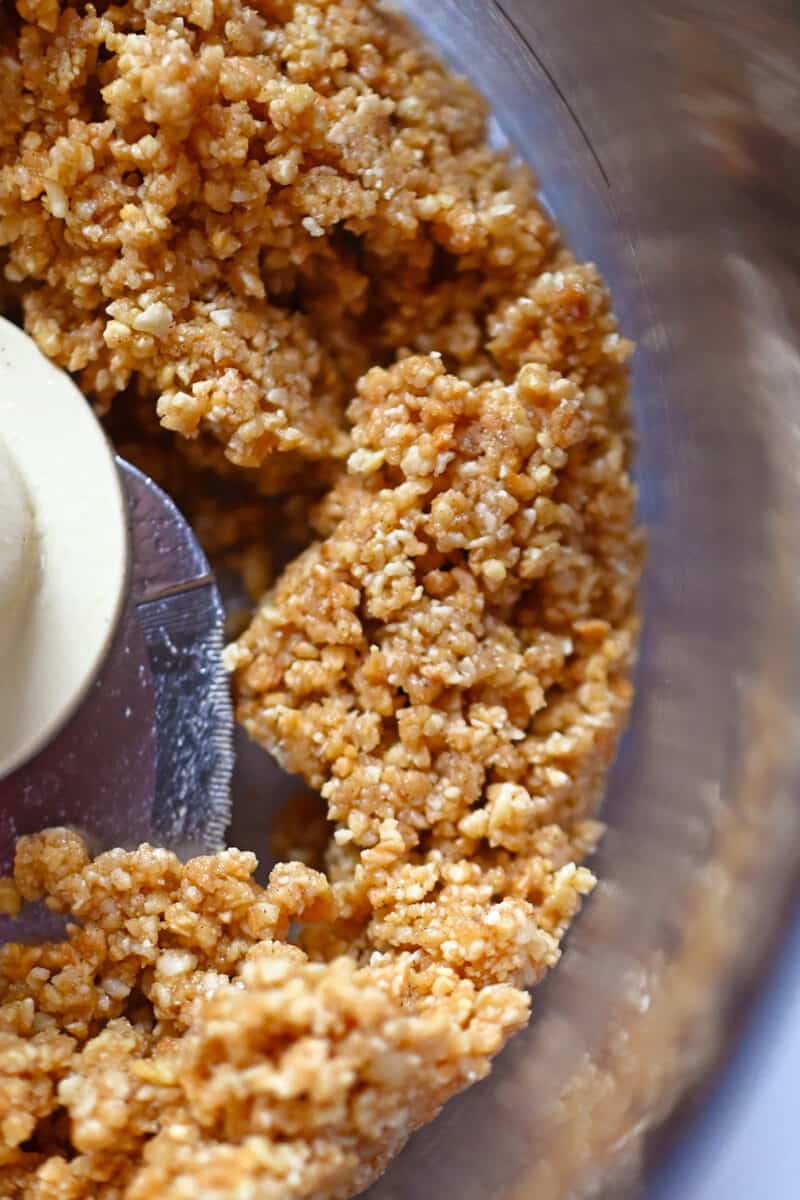
Pulse until combined. The crumbs should stick together when you pinch some of the mixture together between your fingers.
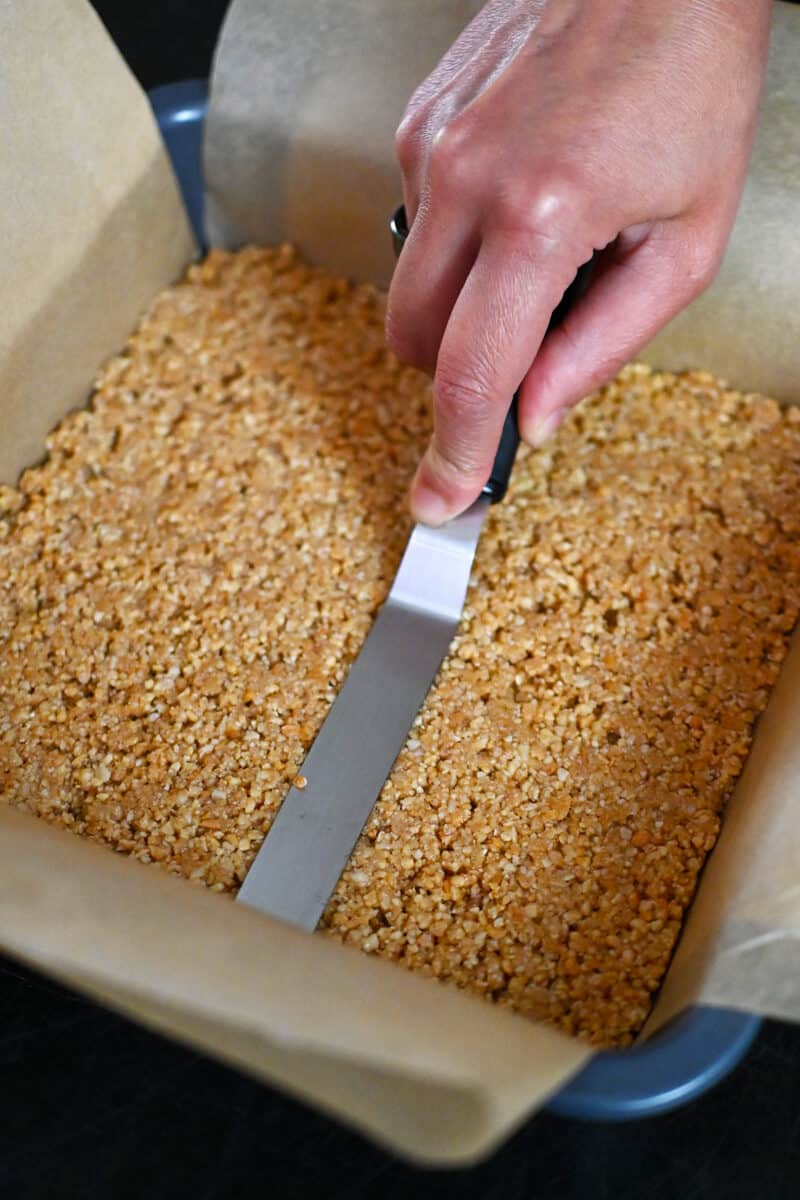
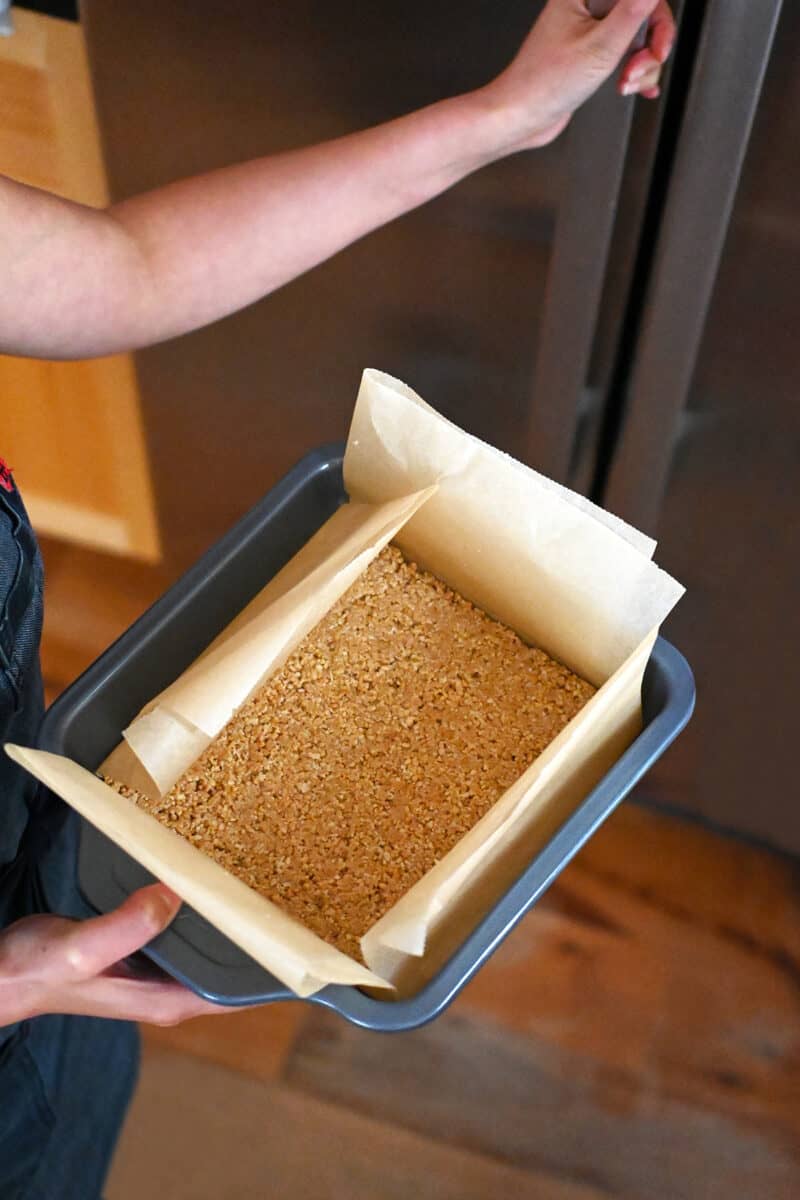
Line a 8-inch square pan with parchment paper and transfer the crust ingredients into the pan. Use an offset spatula to make sure the crust is an even layer.
Place the crust in the freezer while you make the filling.

Make the filling
In a high speed blender, combine the soaked cashews, coconut cream or coconut milk, coconut oil, maple syrup, vanilla, and salt.
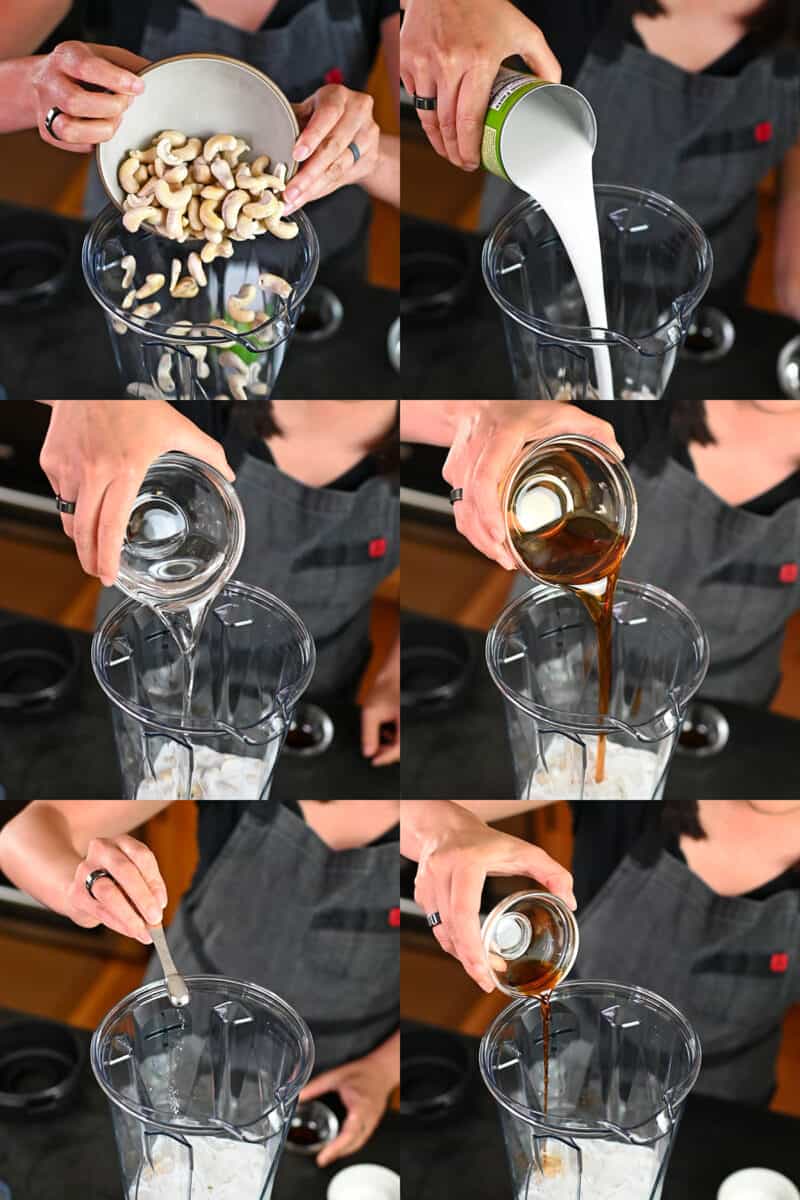
Blend until silky smooth.
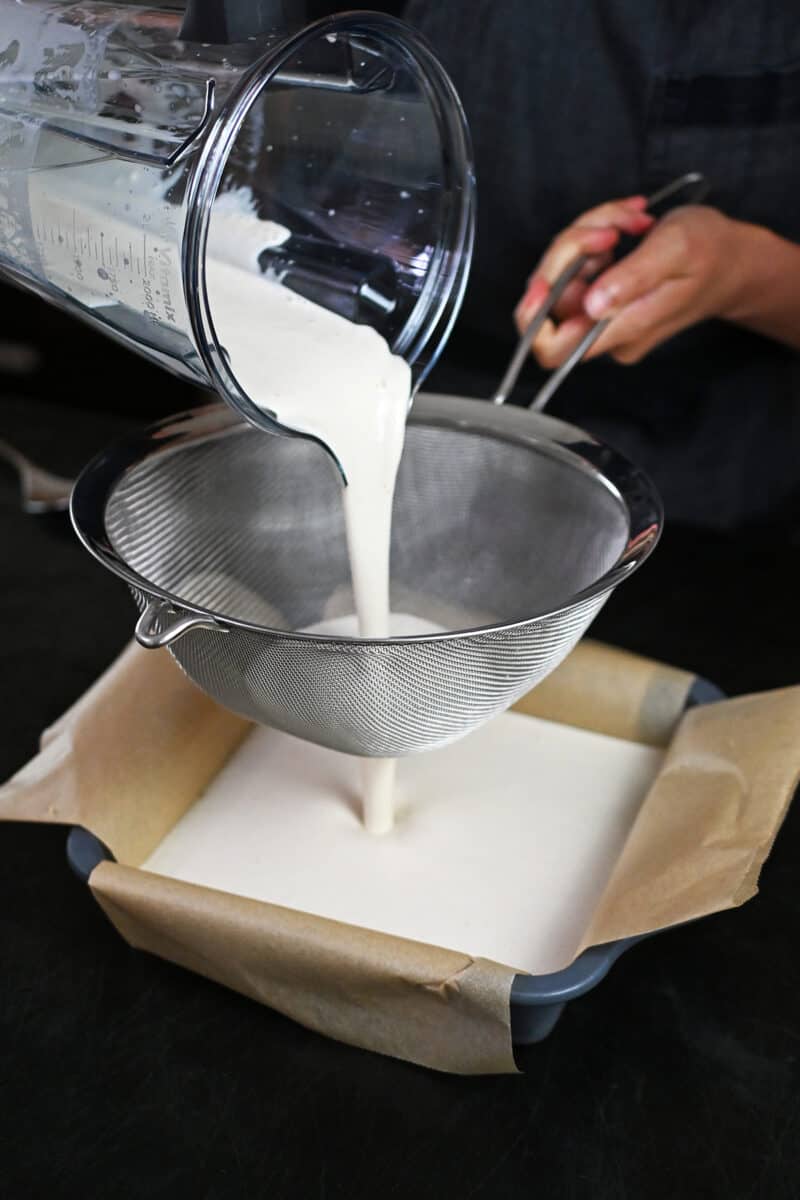
Pour the filling through a fine mesh sieve onto the crust. The sieve can break up any big air bubbles that form.
Freeze the coconut cream bars
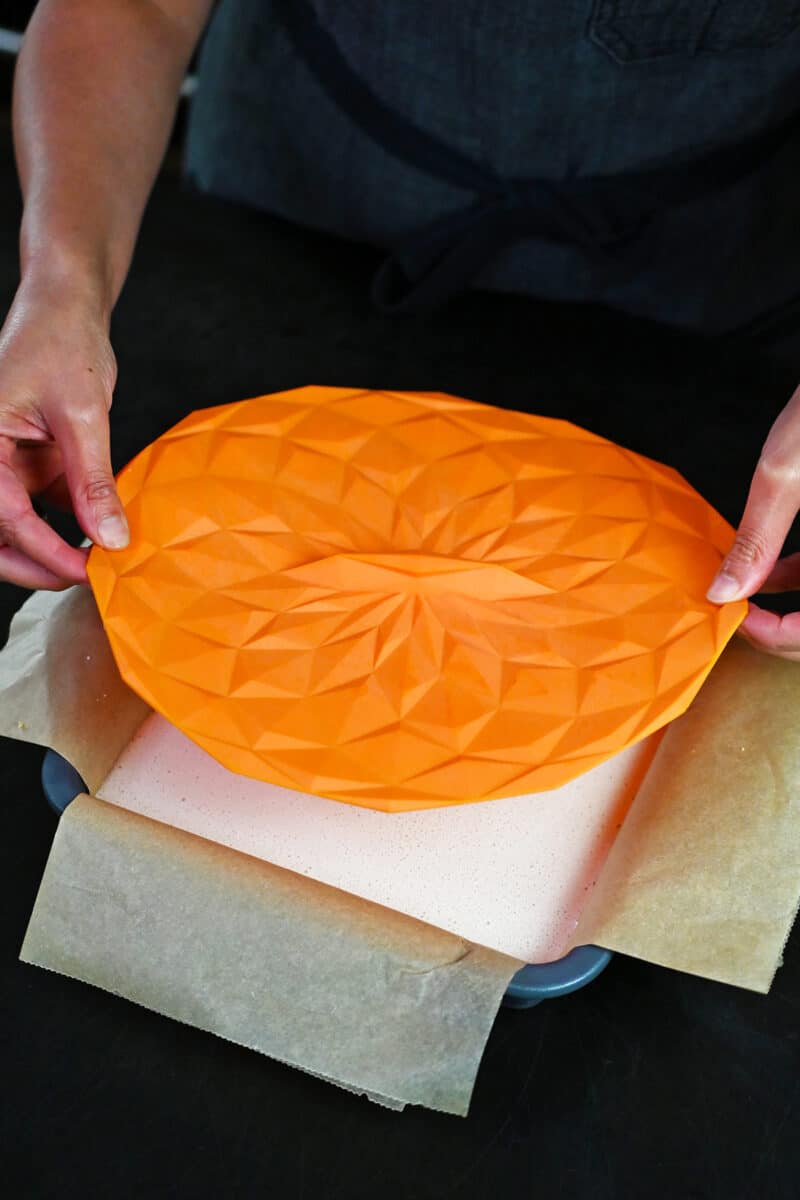
Cover the pan with a silicone lid, aluminum foil, or plastic wrap and freeze until solid (about 6 hours or overnight).
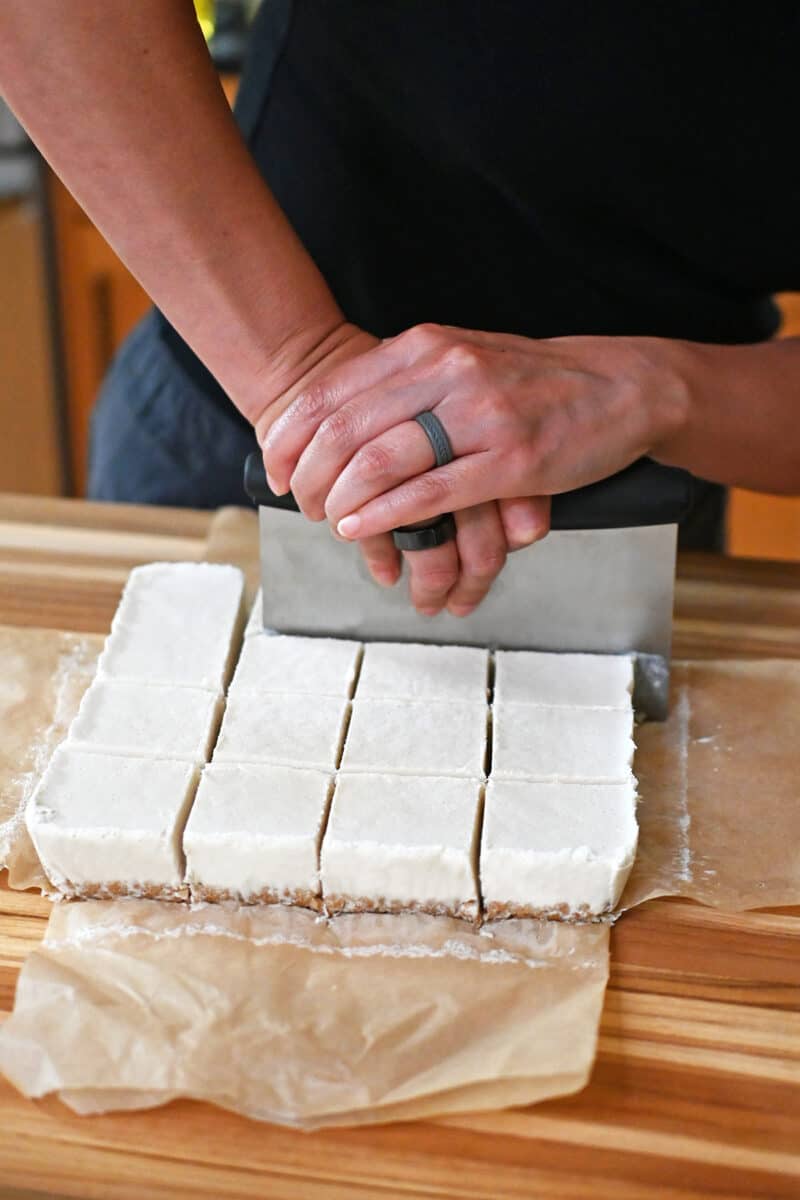
Slice up the coconut bars
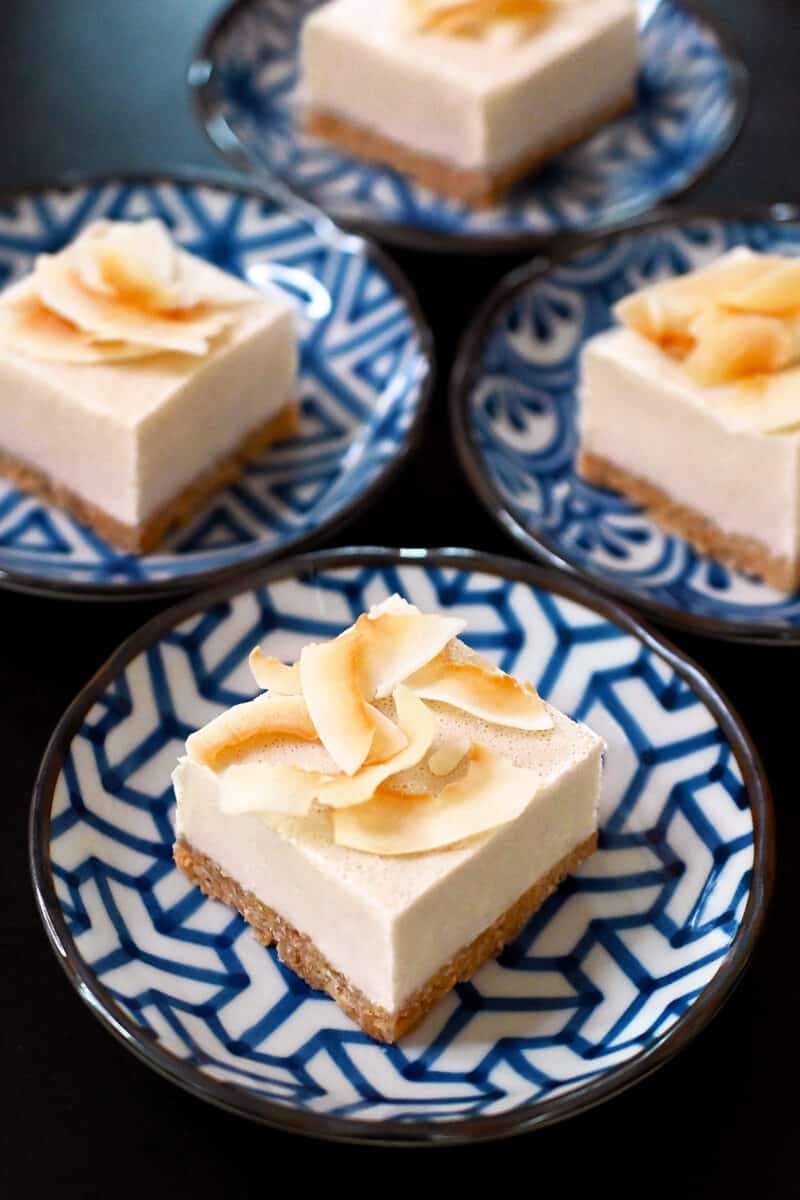
When you’re ready to serve the bars, take them out of the freezer, lift out of the pan using the parchment flaps, and cut into 16 squares with a knife or pastry scraper. If the bars are frozen too solid, let them thaw for a few minutes before cutting.
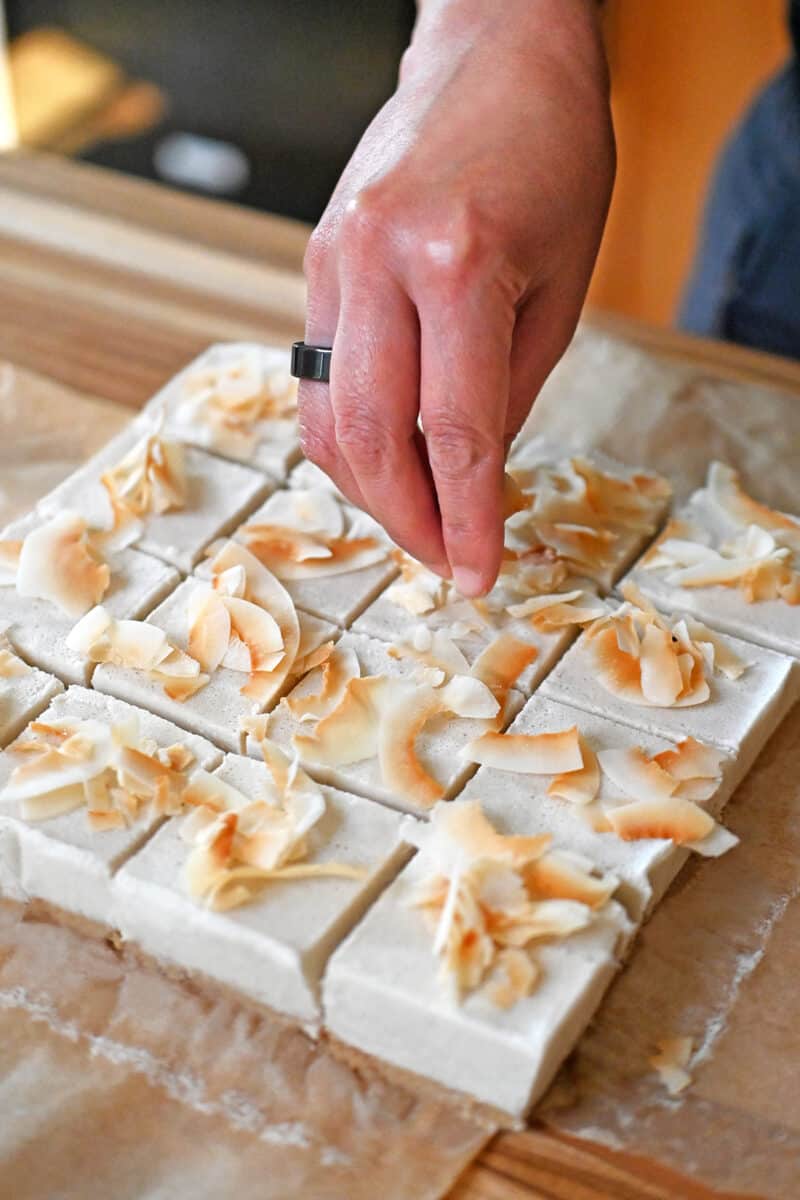
Serve!
Before you eat the bars, go ahead and top them with extra toasted coconut flakes or melted dark chocolate, if desired. They’ll look prettier, too!
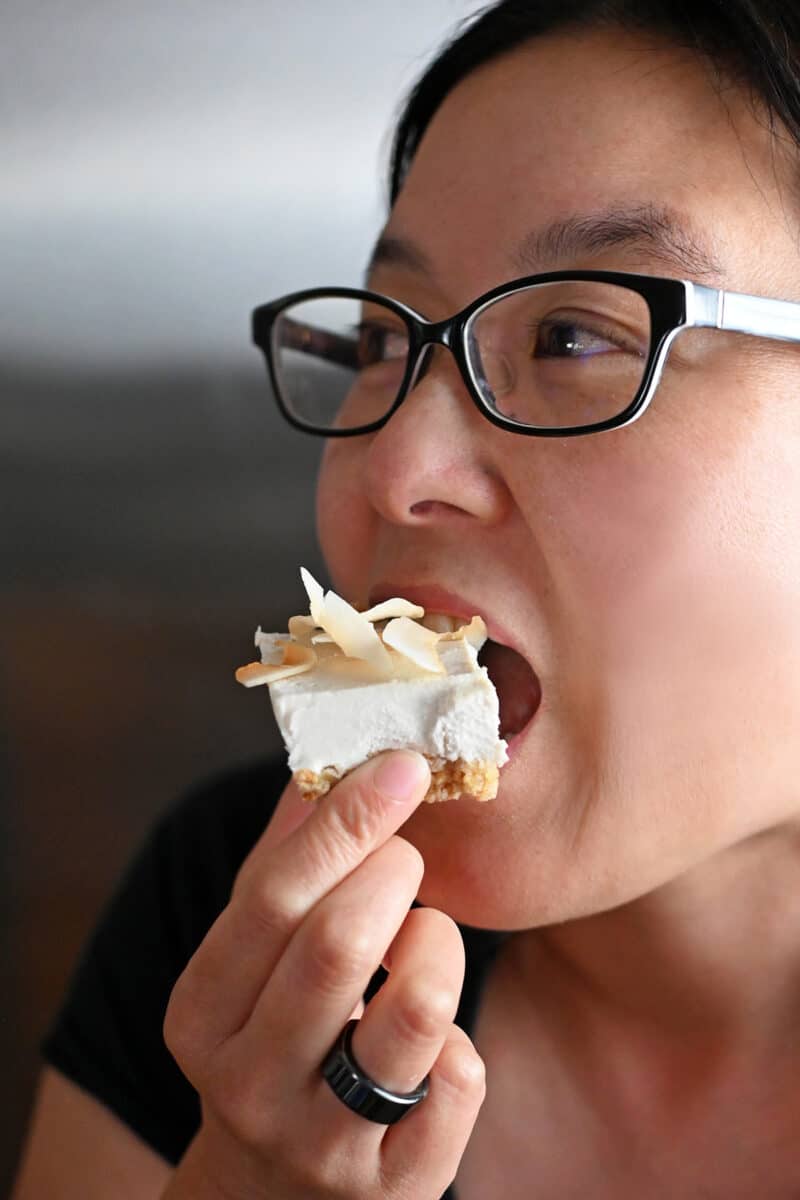
The coconut bars taste great straight from the freezer—almost like coconut ice cream bars!
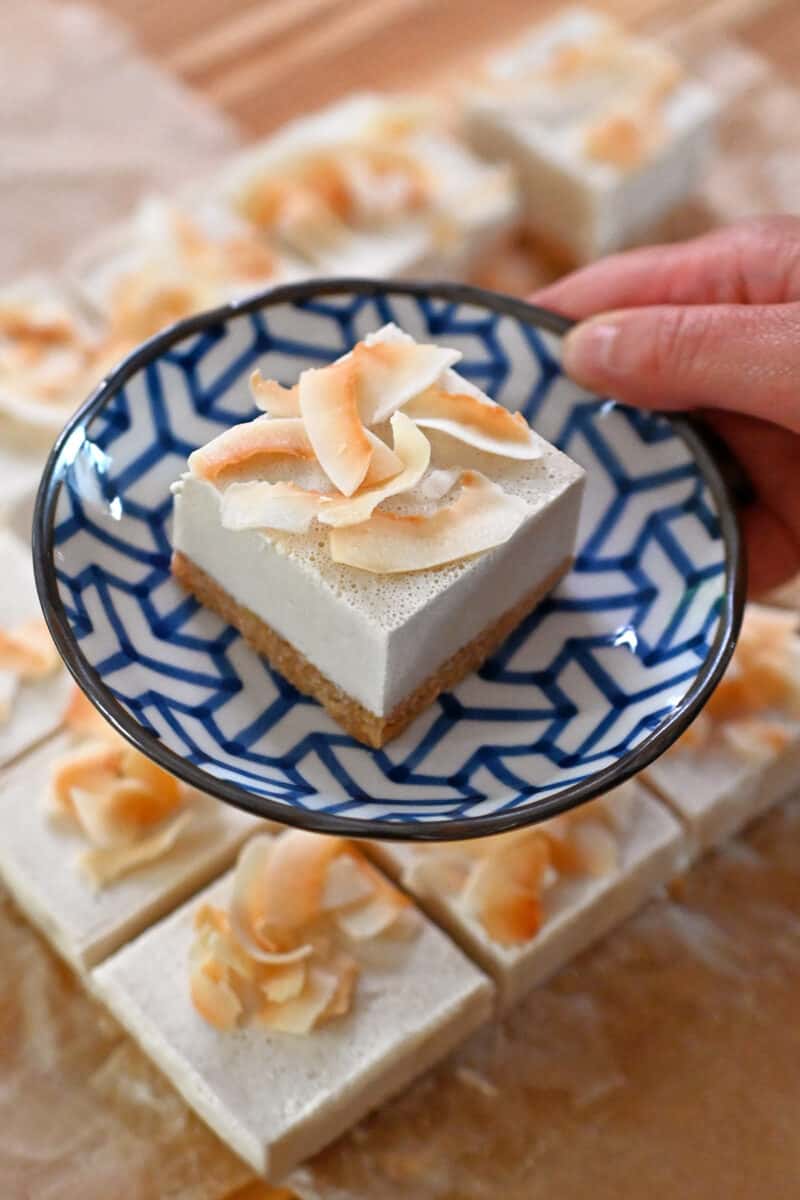
If you prefer the bars to have a softer texture, you can thaw them in the fridge before serving. Either way, they’re delicious!
How to store the coconut cream bars
Store the leftover cut-up coconut bars in the freezer in an airtight container for up to 3 months. You can also store the coconut cream bars in the refrigerator in a sealed container for up to 2 days, but any longer and the texture will get too soft.
More paleo and vegan dessert recipes
Looking for more recipe ideas? Head on over to my Recipe Index. You’ll also find exclusive recipes in my cookbooks, Nom Nom Paleo: Food for Humans (Andrews McMeel Publishing 2013), Ready or Not! (Andrews McMeel Publishing 2017), and Nom Nom Paleo: Let’s Go! (Andrews McMeel Publishing 2022).
PRINTER-FRIENDLY RECIPE CARD
Coconut Cream Bars (Vegan, No-Bake, Gluten-Free)

Ingredients
- 1½ cups toasted almond slivers
- 1 cup toasted unsweetened coconut flakes
- 6 tablespoons maple syrup divided
- 5 tablespoons melted coconut oil divided
- ½ teaspoon ground cinnamon
- ½ teaspoon Diamond Crystal kosher salt divided
- 1 cup raw cashews soaked
- 13.5 ounce canned coconut cream or full-fat coconut milk
- 1 teaspoon vanilla extract
Instructions
- Place the toasted slivered almonds and coconut flakes in the bowl of a food processor and pulse them together until the texture resembles coarse cornmeal.
- Add 2 tablespoons maple syrup, 1 tablespoon melted coconut oil, ½ teaspoon cinnamon, and ¼ teaspoon Diamond Crystal kosher salt. Pulse until combined. The crumbs should stick together when you pinch some together between your fingers.
- Line a 8-inch square pan with parchment paper and transfer the crust ingredients into the pan. Use an offset spatula to make sure the crust is evenly distributed on the bottom.
- Place the crust in the freezer while you make the filling.
- In a high speed blender, combine the soaked cashews, coconut cream or coconut milk, ¼ cup melted coconut oil, ¼ cup maple syrup, vanilla, and ¼ teaspoon Diamond Crystal kosher salt. Blend until silky smooth.
- Pour the filling through a fine mesh sieve onto the crust. The sieve can break up any big air bubbles that form.
- Cover the pan with a silicone lid, aluminum foil, or plastic wrap and freeze until solid (about 6 hours or overnight).
- When you’re ready to serve the bars, take them out of the freezer, lift out of the pan using the parchment flaps, and cut into 16 squares with a knife or pastry scraper. If the bars are frozen too solid, let them thaw for a few minutes before cutting.
- Before you eat the bars, go ahead and top them with extra toasted coconut flakes or melted dark chocolate, if desired. The coconut bars taste great straight from the freezer—almost like coconut ice cream bars! If you prefer the bars to have a softer texture, you can thaw them in the fridge before serving, Either way, they’re delicious!
Video
Notes
- You can quickly soak the cashews in boiling water for 30 minutes (or in room temperature water for about 4 hours).
- Use the best-quality canned coconut cream or full-fat coconut milk you can find! These are coconut cream bars, after all, so the better tasting your canned coconut cream or milk, the tastier the bars. The brands I like best are Aroy-D, New Seasons Market’s in-house brand, and Whole365 brand. Although my recipe says you can use either coconut milk or cream, I’ve found that canned coconut cream is ideal for this recipe because the resulting filling is creamier and the bars hold their shape better. Do not use Cream of Coconut (found in the liquor section)—it’s a totally different ingredient, and it’s waaay too sweet!
- A powerful blender will ensure a creamy and silky texture. Similar to my other vegan desserts that use soaked cashews, the filling of the recipe should be blended in a high-powered blender like a Vitamix.
- Toast the almond slivers and coconut flakes for the most flavorful crust! If you didn’t buy the slivered almonds and coconut flakes pre-toasted, take the extra time to toast them until golden brown—your tastebuds will thank you!
- Freeze the bars to set them properly. The coconut bars will not set properly in the refrigerator so you definitely need to chill them in the freezer before cutting them into squares.
- Store the leftover cut-up coconut bars in the freezer in an airtight container for up to 3 months. You can also store the coconut cream bars in the refrigerator in a sealed container for up to 2 days, but any longer and the texture will get too soft.
Nutrition
Nutrition information is automatically calculated, so should only be used as an approximation.


Hello!
is there a nut that we can replace for cashew (also cannot use walnuts)
thanks
w
This sounds so delicious, but I don’t own a Vitamix and it seems like an expensive purchase just to make a dessert. Can you recommend any other less expensive high-powered blenders I could use for this recipe? Thanks.
My kids don’t even like coconut and they loved this. Our blender was broken, so I just used our regular mixer. If you boil water to soak the cashews in, that helps.
Question: can I place these in my kids’ bento boxes for school lunches and let thaw for about 2 hours at room temperature? Any bacteria concerns?
Hi Michelle,
if using full fat coconut milk, would it be advised to cool the can and pull off the more solid portion, leaving the watery portion behind (to use in soups or something else)? Of course, doing this would probably require 2 cans, instead of one…but I think would create a creamier product (???).
You can use one full can including any solid portions since you are blending it up anyway.
Can only do almonds due to nut allergy in the family. Any subs for the cashews?
There isn’t a great substitute for the cashews. You could use macadamia nuts, but that could be an expensive experiment! You’d also have to soak the macadamia nuts longer.
Almonds won’t give the same creamy texture.
Michelle does have another coconut desserts! Check out her Melo Melo copycat recipe on the blog, or her Coconut Almond Jelly recipe in her latest cookbook Let’s Go!
This looks like another winner from Michelle! My question- where’s a reliable bulk cashew source? Most places I see bulk cashews they have black moldy looking spots on them, I don’t think they are a good choice. It’s either that or salted ones.
I buy my raw cashews from Costco!
TASTES AMAZING! Easy recipe, wonderful result.
I love this recipe! Totally itches that ice cream itch.
Michele, how about using cacao butter instead of coconut oil? I use it in my protein balls because it’s hard in it’s normal state so my protein balls get harder that way.
I’m not sure because I haven’t tried it!
Hi very excited to make but a little confused! In the recipe it says 5 tbsp coconut oil but in the instructions it says to add 1/4 cup coconut oil to the filling any suggestions?
Hi Gauri! The recipe calls for 5 tablespoons of coconut oil but it is divided between the crust and the filling. You use 1 tablespoon for the crust and 4 tablespoons (or 1/4 cup) in the filling.